Give me security; WordPress&MySQL!
This is a follow-up on a previous blog post of mine. I don’t like to leave the security of the solution hanging as we are exposing the MySQL database to the internet up in the cloud. There exist a possibility to use Azure internal virtual network, though for that your web site must use a more expensive tier. So therefore I will address how to set up a secure connection from the WordPress frontend to the MySQL backend.
First you will need to download OpenSSL (I’m using the Windows lite version found here).
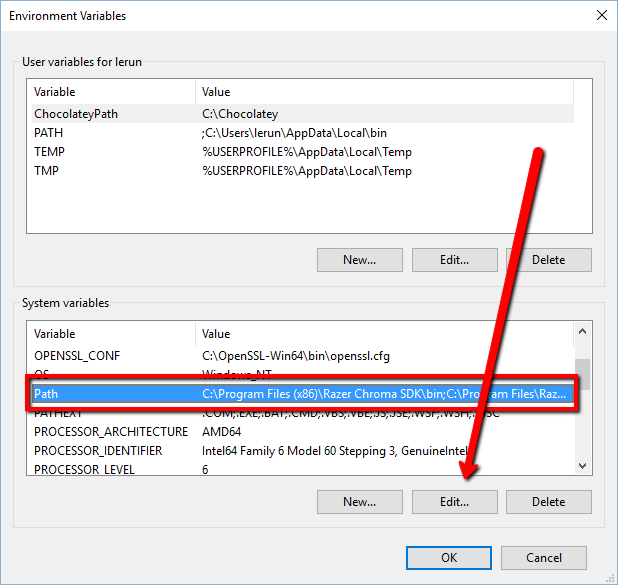
Install this to an appropriate folder and add the path to the environment setting.
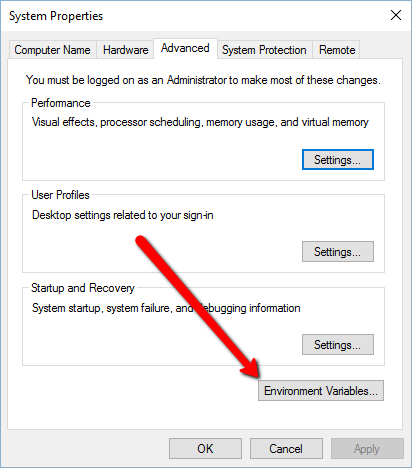
If on Win10 just hit the windows button on your keyboard and enter the search term: System. Go to Advanced system settings, and enter the path to where the OpenSSL software installed.

Then open an cmd window and type in:
1 | set RANDFILE=C:\OpenSSL-Win64\.rnd |
(change out the file path to where you installed OpenSSL)
Reboot
Create Certificates
Now we can start using OpenSSL to create the certificates we need. First create a folder to hold the files in, for me I used: c:\temp\MySQLCerts
Open the command prompt again (CMD) and go to the folder.
Then run the following commands:
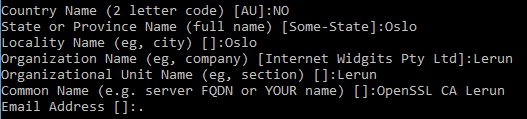
1 2 | openssl genrsa 2048 > ca-key.pem openssl req -new -x509 -nodes –days 9999 -key ca-key.pem -out ca.pem |
Remember to fill inn some of the prompts or use . (dot) if you want to leave it empty. This will be the CA certificate. I’m using 9999 days, so the certificate will never expire in the lifetime of the database.
Next we will create the server certificate.
Enter the commands:
1 | openssl req -newkey rsa:2048 –days 9999 -nodes -keyout server-key.pem -out server-req.pem |
Remember here to also type in something, and make sure the Common Name is not the same used for generating the CA certificate or an error will occur.

Next run:
1 2 | openssl rsa -in server-key.pem -out server-key.pem openssl x509 -req -in server-req.pem –days 9999 -CA ca.pem -CAkey ca-key.pem -set_serial 01 -out server-cert.pem |
Verify the certificates with the command:
1 | openssl verify -CAfile ca.pem server-cert.pem |
Both certificates should come out with a OK in the command window printout.
MySQL Docker VM
Get your favorite SSH client, I used MobaXterm for my session. Log into your MySQL VM in Azure by either inputting the IP or DNS of the server. This can be found going to the Virtual Machine tab in the Azure portal and look at the settings of the VM.
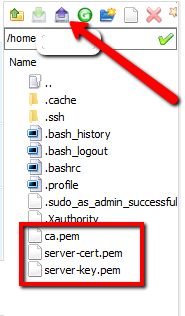
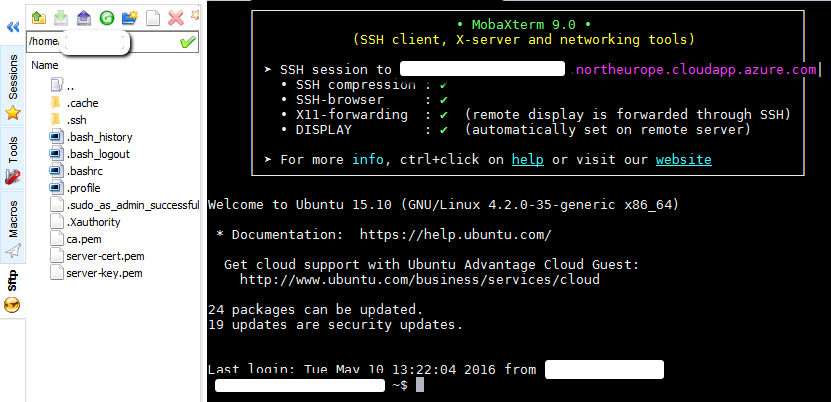 Login to the server and copy the 3 files ca.pem, server-cert.pem and server-key.pem from where you created them into the VM. Using MobaXterm this is easy as you can just use the upload functionality in the client.
Next mount the docker container running MySQL in the VM. Find the name of the container by running the command: docker ps to find the name of your container. Mine was named compose_mysql_1

Then use (mounts the Container):
1 | docker exec -it compose_mysql_1 bash |
You will now be inside the container, from here run:
1 2 | mkdir /etc/mysql/ssl && cd /etc/mysql/ssl exit |
You are now back in the VM, run these commands from there to copy the certificate files into the container:
1 2 3 | docker cp ca.pem compose_mysql_1:/etc/mysql/ssl/ca.pem docker cp server-cert.pem compose_mysql_1:/etc/mysql/ssl/server-cert.pem docker cp server-key.pem compose_mysql_1:/etc/mysql/ssl/server-key.pem |
Enter the container again with the docker exec command from above.
Then run the command below to set the correct security rights for the files:
1 | chown mysql:mysql /etc/mysql/ssl/* && chmod ug=wrx /etc/mysql/ssl/* |
We will now need an editor to change the config file of MySQL; so do this inside of the container:
1 2 | apt-get update apt-get install vim |
When finished run:
1 | Vim /etc/mysql/my.cnf |
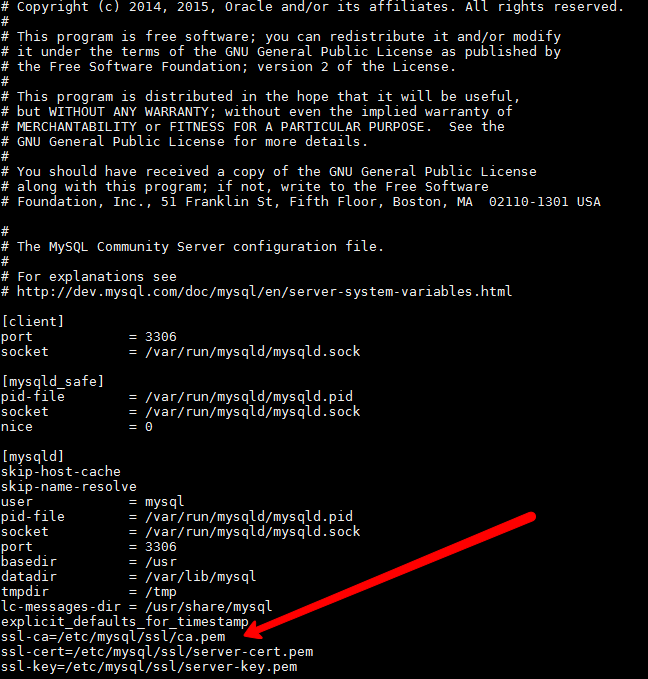
Inside the editor navigate to the [mysqld] section, place the cursor at the bottom of this section where there is a free space and press the i-button to enter insert mode. Once in insert mode enter the text:
1 2 3 | ssl-ca=/etc/mysql/ssl/ca-cert.pem ssl-cert=/etc/mysql/ssl/server-cert.pem ssl-key=/etc/mysql/ssl/server-key.pem |
Press Esc to end edit mode, and then enter :wq (including : symbol) to save the file.
Then run the following commands from the commandline:
1 | exit |
Once out of the container restart it with the following command:
1 | docker restart compose_mysql_1 |
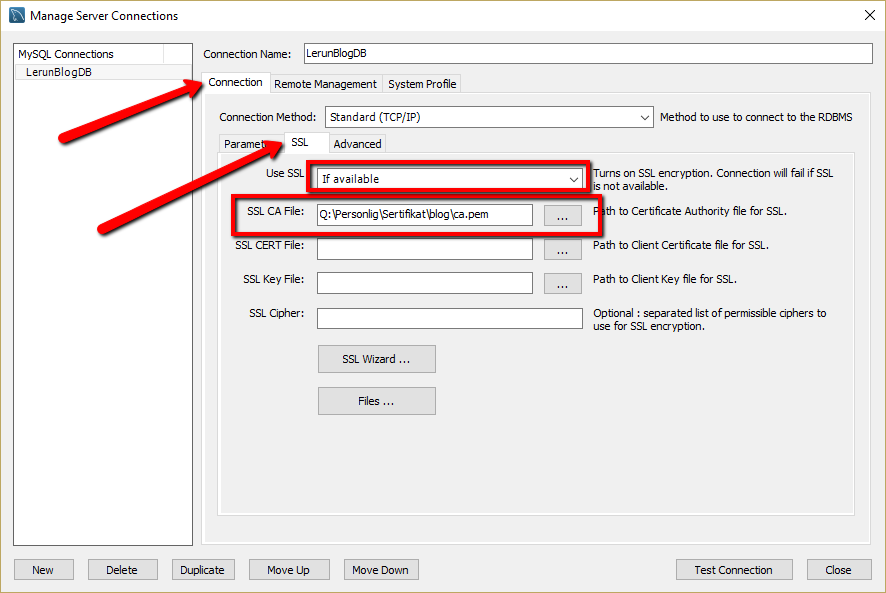
SSL should now be activated. To check use MySQL Workbench and add the CA certificate to the Blog DB connection settings.
Run the command:
1 | SHOW VARIABLES LIKE 'have_ssl'; |

WordPress
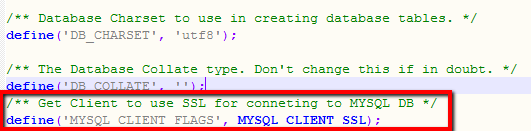
Now you will need to add a line to a file in the WordPress site. Use a FTP client to log on to the site and open the wp-config.php file. Find the section with the text: define(‘DB_Collate’,’’);
Below this line enter the following text:
1 | define('MYSQL_CLIENT_FLAGS', MYSQL_CLIENT_SSL); |
Save the file, and do a restart of your site. Your connection the database is now encrypted.
I want to thanks this blogger for showing me the correct Linux commands to run.
Happy tinkering!